Flux and Android
Motivation
I recently embarked on a journey to make a new android application for a start-up that I am a part of. Being a software contractor, it is rare that I have the opportunity to build something from scratch. When this opportunity presented itself, I was excited to be able to implement my arsenal of best practices and architecture patterns on the ground floor of a project.
For a large part of the last year I was working on a web project and didn’t have much opportunity to keep up with Android. The team I was on was using AngularJS for the project and we had a heavy focus on making sure that all of our code was like Lego blocks (loose coupling, lots of DI, and side effects only when absolutely necessary). Programming in this way was extremely liberating and I wanted to be able to keep it up after I switched back to Android. This of course, I knew would be no easy task… as if the absence of functions as first class citizens wasn’t depressing enough…
I decided to start with dependency injection. I knew there were libraries out there to do this in Java and thus android, but I had always struggled with them in the past. After watching a some really great talks…
- DAGGER 2 - A New Type of dependency injection by Gregory Kick
- The Future of Dependency Injection with Dagger 2 by Jake Wharton
- Dagger: A Fast Dependency Injector for Android and Java by Jesse Wilson
- Android App Anatomy by Eric Burke
and reading a few articles…
- Android Dependency Injection
- Blog List: Adding a Blog View Activity, Butterknife, and Dagger
- Dagger 2 has Components
- Dependency injection on Android: Dagger (Part 1)
- Dagger: dependency injection on Android (Part 2)
- Android Unit Test Idioms
- Android Testing With Robolectric
I decided Dagger 2 seemed like the right way to go. After a bit more digging I found Butterknife for view injection. The biggest problem I ran into was the distinct lack of examples on how to use Dagger 2 effectively (probably because it is still in beta). I did find a few, but they were mostly targeted on how to set it up and not so much on how to use it in an actual android application.
- Dagger 2 - Simple
- Dagger 2 - Android Simple
- Dagger 2 - Android Activity Graphs
- U2020
- U2021
- Android Studio Robolectric Test Example
- Tutorial: Set up android + gradle project with dagger
- Instrumentation Testing with Dagger, Mockito, and Espresso
- Dagger2 Example
- SOLID: Noun Project Browser
After I figured out what I wanted to do for dependency injection, I wanted to figure out a good application architecture that would allow for very loose coupling and make it easy to separate view logic from business logic (something I got pretty good at in Angular). Another benefit of having an architecture like this is that it makes TDD much easier… Mocking activities and views just to be able to test that your models behave as they should is absurd.
The architecture I decided on was Flux. Obviously, Facebook made the Flux architecture for the web, and thus JavaScript, so I had to do a little bit of adapting in order to get it to work on Android. With a little bit of tweaking (mainly with the dispatcher and they way the views accessed data) and the assistance of the Otto library by Square, I came up with a version of Flux that was Android compatible.
I finally had come up with something that I thought would work pretty well. However, rather than jump right in and start building an application with an untested architecture pattern and minimal familiarity with Dagger 2, Butterknife, and Otto, I decided to take this idea on a test drive first… I followed Facebook’s (… and everybody else’s) example and built a simple, but fully functional, todo application (Hence the name FluxyTodo). On top of wanting to see how this architecture would pan out, I wanted to provide everybody with another example of how to use Dagger 2, Butterknife, and Otto. Since the examples for these libraries in use are pretty sparse, especially in fully functional applications, I figured it would be a good addition to the community.
…Plus if more people adopt this architecture, android development might become a little less painful for everybody!
Now on to the good stuff…
Architecture
I came up with this architecture after looking at Flux and trying to apply those concepts to Android, so if you have worked with Flux before, this section will be pretty familiar to you.
Here is the basic architecture template
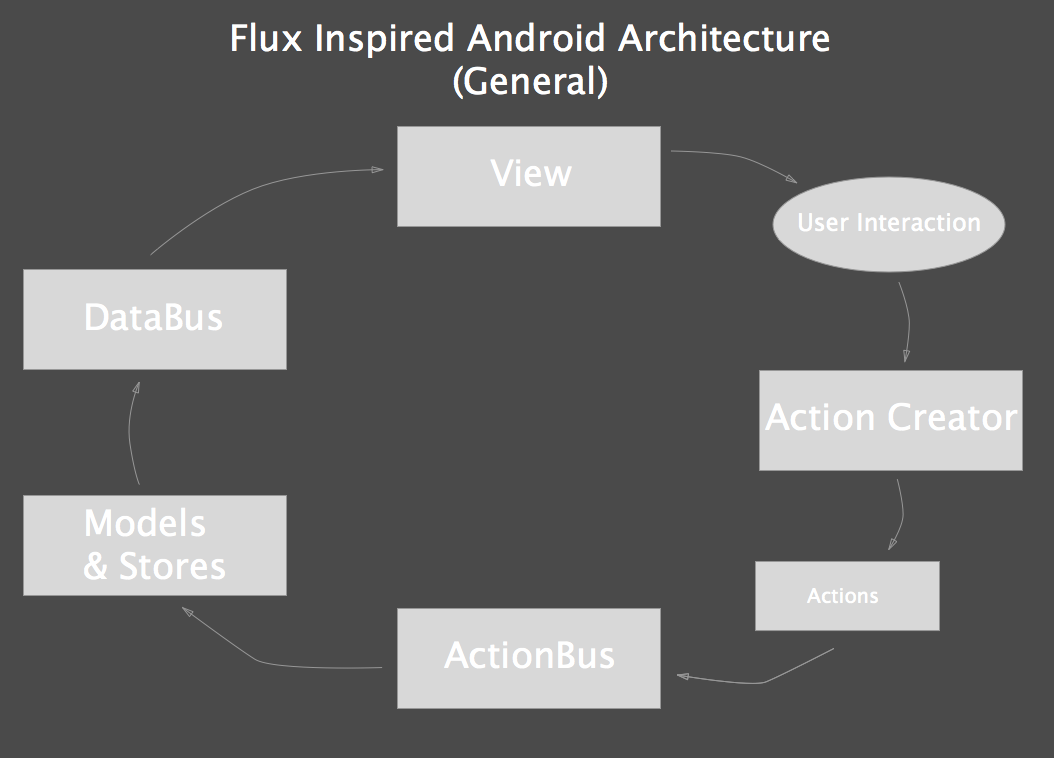 As you can see, it is pretty similar to how Flux works with only a few modifications to make it Android Friendly. The main difference is in how the dispatcher works. Rather than build a dispatcher to mimic the behavior of the one Facebook built, I used an event bus instead (Otto). Another minor difference is that I use models and stores, as opposed to just stores. Stores are dedicated for view state, while models hold other application data and business logic.
A detailed explanation of each part of the system
View
This is what controls what is being displayed to the user. In Android, this means that activities and fragments, along with their xml components, are classified as views. A view should ONLY be responsible for building and displaying what should be presented to the user and listening for actions taken by the user on that view. There should be absolutely no data manipulation or business logic in the view layer. View logic pertaining to view state should also, preferably, be kept to a minimum.
When the user preforms an action on a part of the view, the view should delegate handling that action to the action creator. If this is done correctly, the view should only ever have to talk to one other thing, the action creator. For example, if a user clicks on an upload button, the view should tell the action creator to create an upload action.
As for inflating view elements with data, the view should only have to listen to one source, the data bus. Once the view is created, the view should subscribe to events on the data bus. Once data comes in, the view can then take the data and bind it to whichever view component needs it.
Action Creator
The action creator has 2 responsibilities. It’s first responsibility is to provide an API for the view to call upon. These API endpoints should correspond to possible actions the user can preform on the view. If you had a calculator app for example, your action creator should have methods such as createAddAction, createSubtractAction, and so on. Depending on how you implemented your calculator, those methods may also take a parameter, for example,public void createAddAction(float numberToAdd).
The action creator’s second responsibility is to create action objects and post them to the action bus.
Action Bus
The action bus is the event bus that all actions are posted to. The stores and models listen for specific actions posted to this bus in order carry out view logic or business logic, respectively.
Stores & Models
Models are where data is stored and transformed. Models in this case are similar to models in an MVC type framework. Models will subscribe to events posted onto the action bus. To continue with the calculator example, if an AddAction object is posted to the action bus, the model will receive that event, then add a number to whatever the current number is then post the updated data to the data bus.
Stores are different than models in that the data stored in the store is strictly related to the current view state. To continue with the calculator example again, you could have a undo buffer stored in the store, as this data doesn’t relate to the actual application state. As another example, if you had some sort of list app and wanted to be able to live filter that list, your filtered list could be put in the store, while the raw list would be part of a model.
Data Bus
The data bus is the event bus that all model or store updates are posted to. The view subscribes to data posted on this bus in order to keep the view in sync with the data.
TDD!
This architecture decouples all the parts of an Android app which makes development much easier. Additionally, DI becomes easier, and practicing TDD becomes much less of a headache!
Following is a diagram illustrating a few recommended approaches to TDD you could take using this architecture.
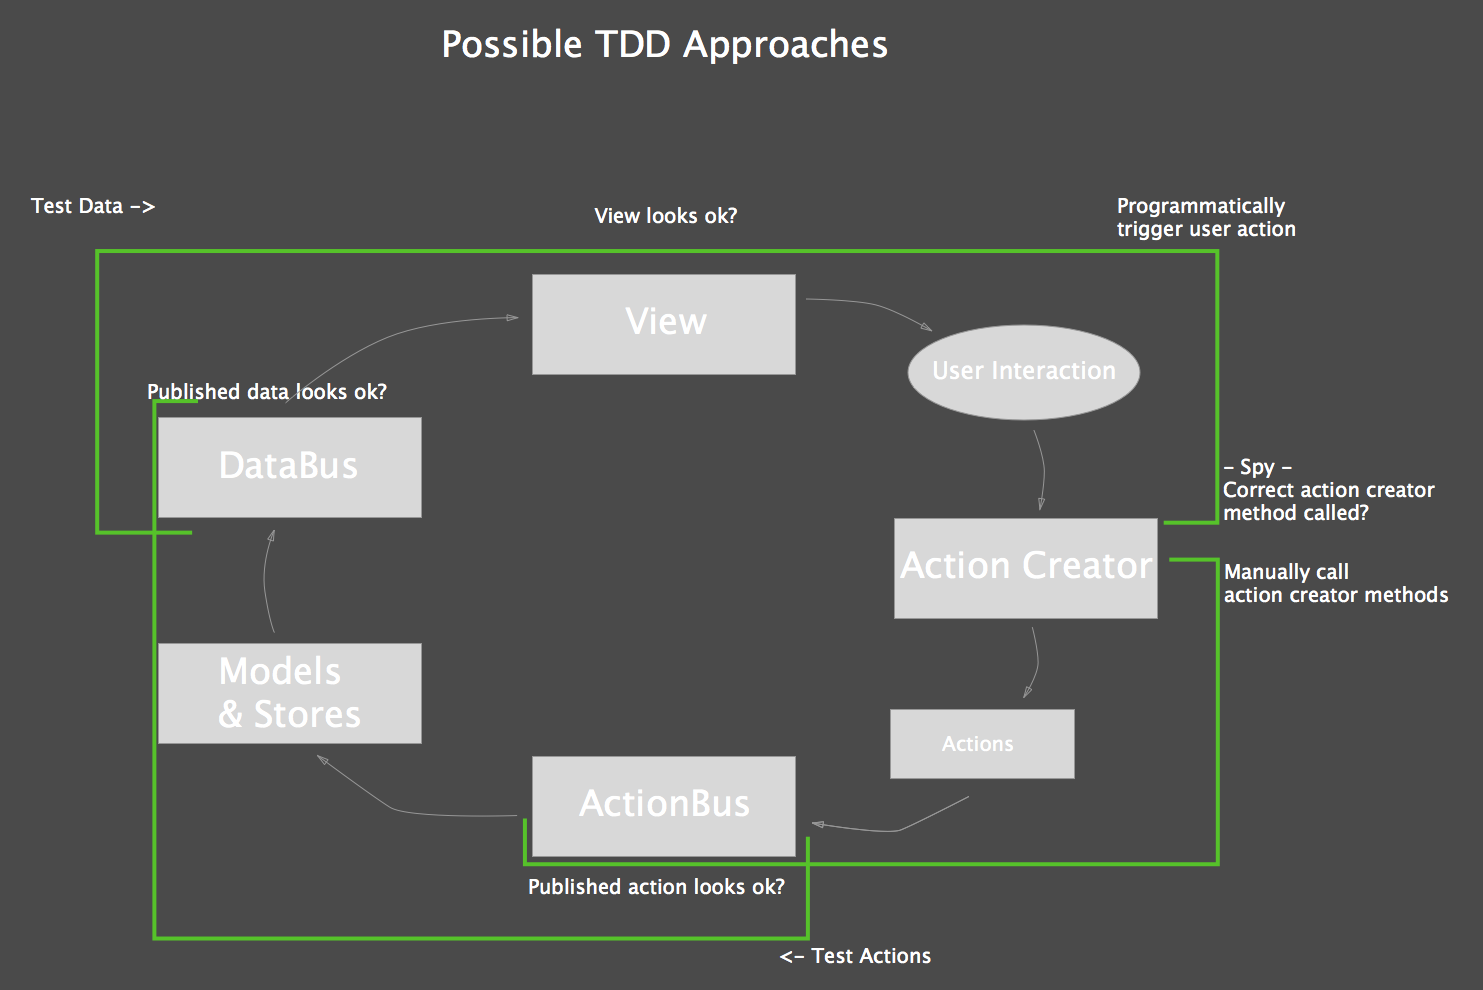
Views
There are a couple things you want to test in each view component.
- First, you want to make sure that your view component is properly connected to the data bus and that it looks correct once inflated. This can be easily tested by posting test data to the data bus and then testing to make sure that data was used to properly inflate the view.
- Second, you want to make sure that your view component is properly connected to the action creator. Using Mockito, you can spy on the action creator and make sure that when user actions are triggered, the correct action creator method is triggered with the correct data.
Note: I did not implement these tests in my code due to the fact that Robolectric does not yet support API level 21.
Actions
For each action creator you have, if you have multiple, you should test that each creator method correctly builds the appropriate action and posts it to the action bus. To test this, you can simply call the creator method and listen on the action bus to make sure that the correct action object was posted to the bus and that it contains the correct data.
Models & Stores
Models and stores are the heart of you application and thus, will require most testing. Each model and store object should be fully unit tested. For simple objects that do not listen to actions or post data to the data bus, standard unit tests will do just fine. For Models and stores that listen for actions and post data to the data bus, along with testing business logic, you need to test that they are properly connected to each bus.
Implementation
To put this new architecture to the test, I decided to use it for a simple todo app (Really original of me, I know…).
Here is a diagram along with a detailed explanation of how each part works.
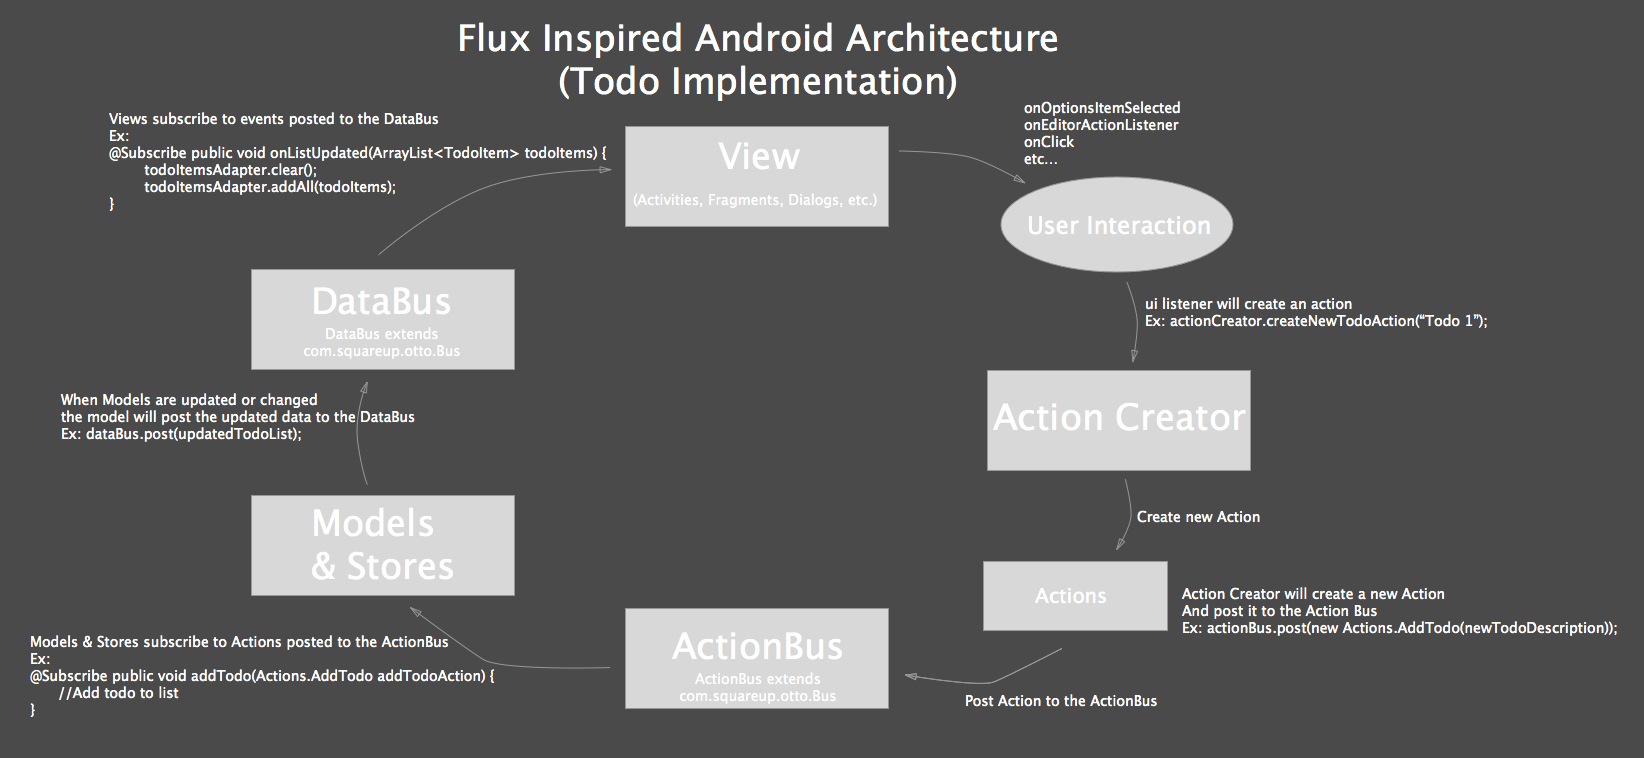 If you want even more detail, you can look at the actual code provided in this repository.
References
As far as explaining each library in detail, there are a few good tutorials already out there that do a pretty good job…
- Videos
- Articles
- Github Pages / Example Code
Future work
Despite the fact that this app is completely self contained (similar to how the todo app works from Facebook’s Flux), I am pretty satisfied with out it turned out. I came up with a couple different ideas on how server communication might be incorporated into this architecture, but I wasn’t really happy with any of them. Obviously, to be complete, server communication must fit into the equation somewhere, so that’s what I’ll be working on next. Once I come up with a solution that I’m satisfied with, I will update this blog to reflect what I came up with.
Todo:
- Figure out how to incorporate server communication into architecture
- Set up db at firebase for todos
- Make app sync data to firebase
- Revise blog to incorporate server communication into architecture.
Code
The ToDo app that I wrote to accompany this post can be found here